
Azure Security Services: How Do They Compare?

Navigating Microsoft Azure's security ecosystem can be overwhelming. This guide cuts through the complexity to explain the core services that form a comprehensive cloud security and governance framework.
The Governance Loop:
- Azure Policy - Governance & Compliance (Always free) → Azure Firewall - Network Protection (No free tier) → Azure Defender - Threat Detection (30-day free trial) → Azure Security Center - Centralized Monitoring (Free basic features) → Azure Sentinel - SIEM & SOAR (Pay-per-use)
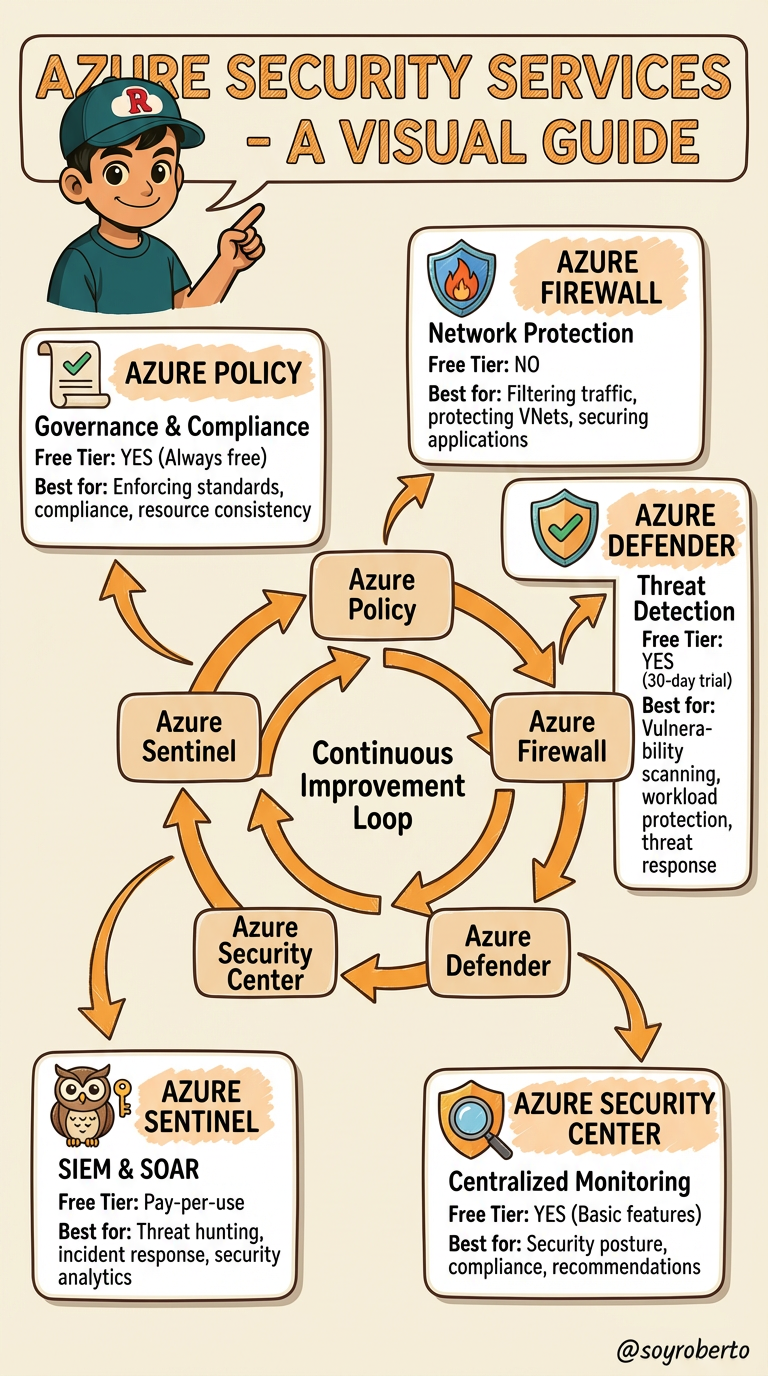
The Foundation: Azure Policy
Think of Azure Policy as your cloud rulebook. It's a free governance service that automatically enforces standards across your Azure environment. Whether it's ensuring all storage accounts are encrypted, restricting VM sizes to control costs, or mandating resource tagging for finance tracking—Azure Policy makes compliance proactive, not reactive. It's your first line of defense in establishing guardrails.
Your Security Dashboard: Microsoft Defender for Cloud
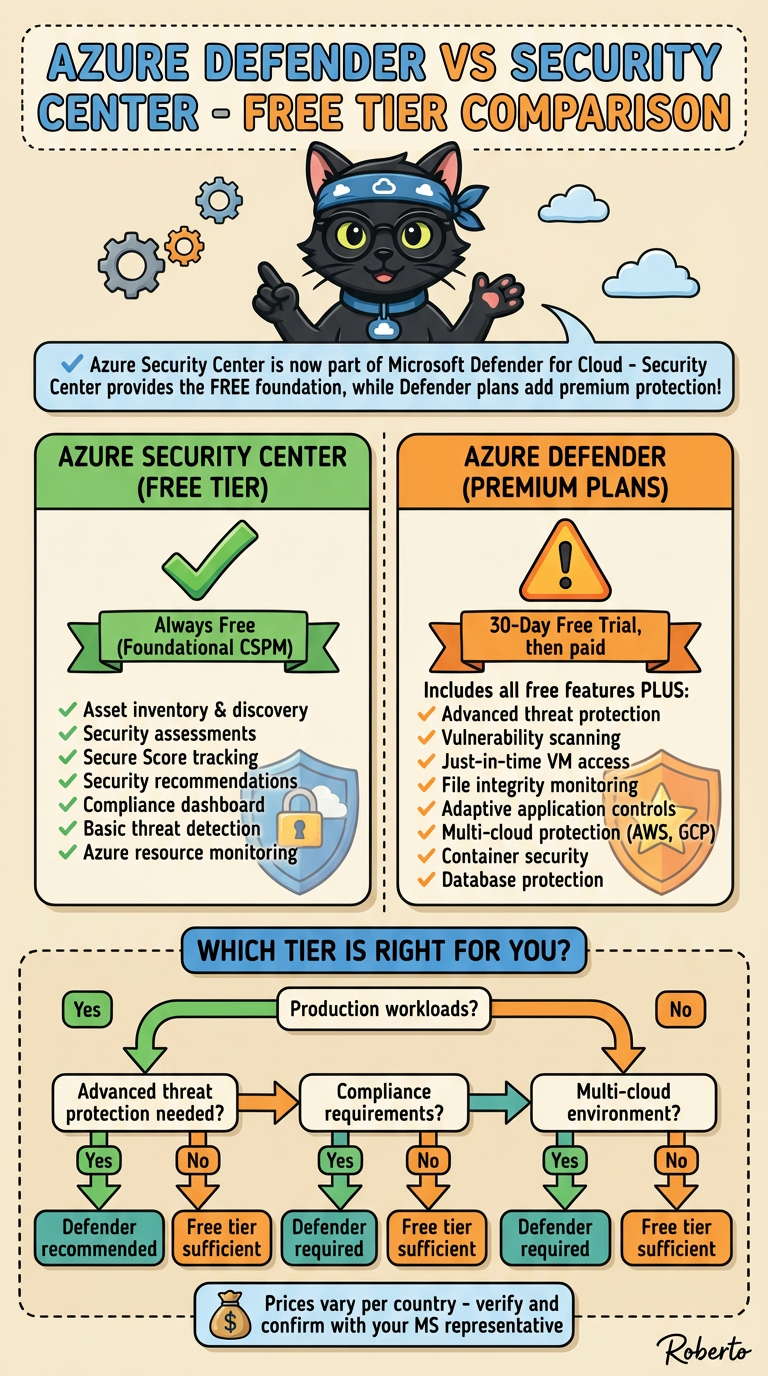
Formerly Azure Security Center, this is your centralized security command center. The free tier provides continuous security assessment and actionable recommendations (your "secure score"). Upgrade to the paid Standard tier for advanced threat protection across virtual machines, containers, SQL databases, and more. It's essential for maintaining security posture and meeting compliance requirements.
The Intelligent Shield: Microsoft Defender for Cloud (Workload Protection)
This is the advanced threat detection component within Defender for Cloud. It provides real-time protection against attacks, using behavioral analytics and threat intelligence to detect suspicious activity. Think of it as antivirus and intrusion detection built for the cloud era, protecting your workloads wherever they reside—Azure, on-premises, or even other clouds.
The Network Gatekeeper: Azure Firewall
Azure Firewall is a managed, cloud-native firewall service that provides centralized network security. Unlike traditional firewalls, it offers application-level filtering, threat intelligence feeds, and automatic scalability. It's ideal for controlling outbound internet traffic, protecting spoke networks in hub-and-spoke architectures, and implementing network segmentation strategies.
The Security Operations Hub: Microsoft Sentinel
Sentinel is Azure's cloud-native SIEM and SOAR solution—your security operations center in the cloud. It collects security data from across your entire digital estate, uses AI to detect threats, and enables automated response through playbooks. While you pay for data ingestion, Sentinel eliminates traditional SIEM infrastructure costs and complexity.
How They Work Together: A Cohesive Defense
These services aren't isolated tools; they form an integrated security fabric:
Azure Policy sets the rules
Defender for Cloud monitors compliance and detects threats
Azure Firewall controls network traffic
Sentinel correlates alerts and orchestrates responses
Strategic Recommendations
Start with governance: Implement Azure Policy early to establish guardrails
Enable visibility: Turn on Defender for Cloud Free immediately in all subscriptions
Protect critical workloads: Use Defender for Cloud Standard for production environments
Scale strategically: Implement Azure Firewall when network segmentation becomes critical
Mature operations: Deploy Sentinel when you need centralized threat management and automated response
Defender vs Security Center Comparing the Free Tiers
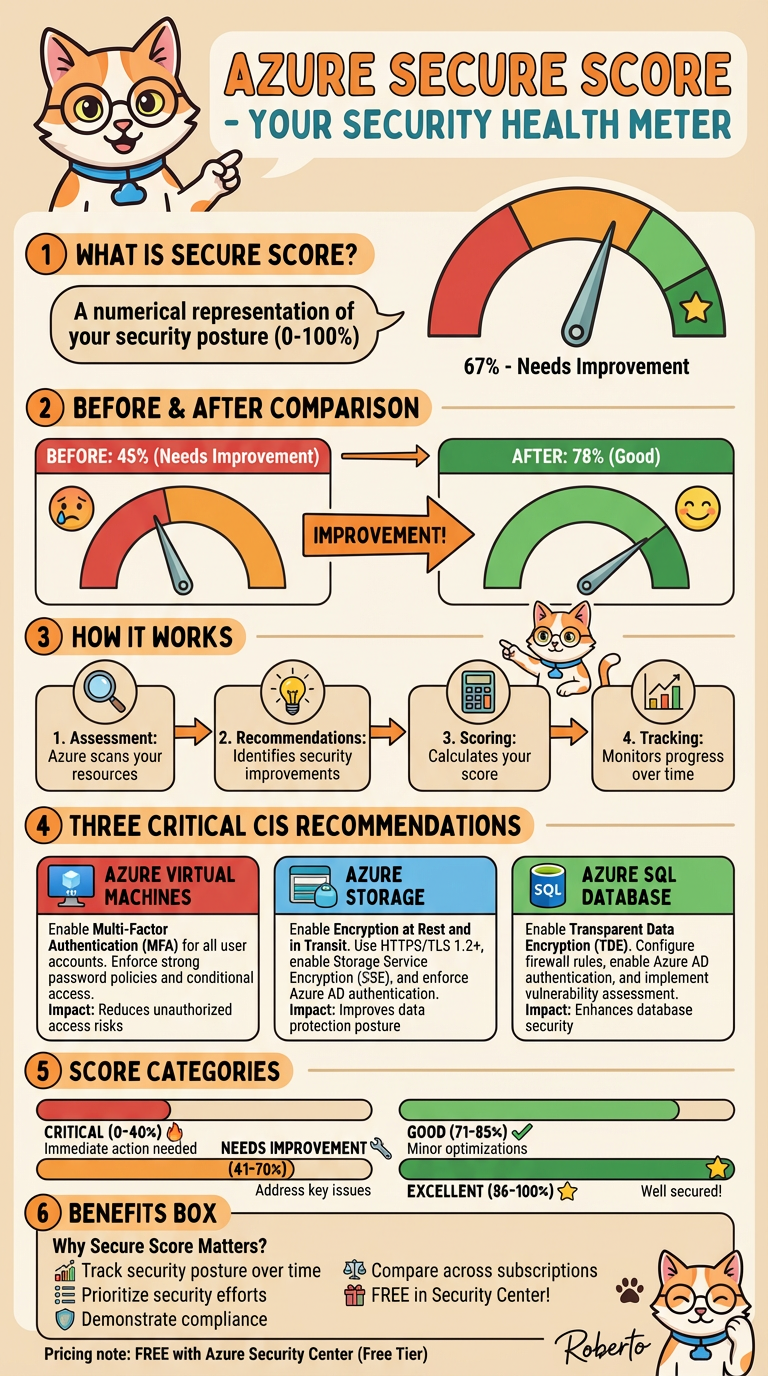
Azure Secure Score: Your Cloud Security Report Card
Azure Secure Score is a security metrics dashboard that measures your organization's security posture across Microsoft cloud environments (Azure, Microsoft 365, Dynamics 365, and Power Platform). Think of it as a "security health score" for your cloud environment.
What It Does:
Measures your security posture against Microsoft's security recommendations
Calculates a percentage score (0-100%) based on implemented security controls
Prioritizes actions to improve your security
Tracks progress over time
How It Works:
Assesses your resources against security best practices
Awards points for implementing security controls
Shows how many points you've earned vs. total possible points
Updates continuously as you add resources and implement recommendations
Key Features:
Unified view across multiple cloud services
Actionable recommendations with step-by-step guidance
Comparison against industry averages
Progress tracking with historical trends
Why It Matters:
Quantifies security in simple numbers
Focuses effort on highest-impact improvements
Demonstrates progress to leadership and auditors
Aligns with industry frameworks like CIS and NIST
Bottom Line: Secure Score transforms complex security configurations into an understandable metric, helping organizations systematically improve their cloud security posture.
A quick view of Sentinel Queries
This query retrieves all Entra ID sign-in logs from the past day, extracts geographic location details (country, state, city) from the structured data, and returns a comprehensive view of authentication events sorted chronologically with key security information including user details, IP addresses, application usage, and risk assessments.
 SigninLogs
 | where TimeGenerated >= ago(1d)
 | extend Country = tostring(LocationDetails.countryOrRegion)
 | extend State = tostring(LocationDetails.state)
 | extend City = tostring(LocationDetails.city)
 | project
     TimeGenerated,
     UserPrincipalName,
     UserId,
     IPAddress,
     Location,
     Country,
     State,
     City,
     DeviceDetail,
     AppDisplayName,
     ClientAppUsed,
     ResourceDisplayName,
     ResultType,
     ResultDescription,
     ConditionalAccessStatus,
     RiskDetail,
     RiskLevelDuringSignIn
 | sort by TimeGenerated desc
This query analyzes failed Entra ID login attempts, filtering for unsuccessful sign-ins (excluding successful ones where ResultType = "0") within the last day. The query retrieves key authentication failure details including timestamp, user identity, source IP address, error codes, descriptions, and geographic location information. The results provide security teams with actionable data to investigate potential brute force attacks, credential stuffing, or compromised account attempts.
 SigninLogs
 | where ResultType != "0"  // 0 = Success
 | where TimeGenerated >= ago(1d)
 | project
     TimeGenerated,
     UserPrincipalName,
     IPAddress,
     ResultType,
     ResultDescription,
     LocationDetails
Azure CIS Recommendations Implementation Guide
Step-by-Step Actions in Azure Portal
1. AZURE VIRTUAL MACHINES: Enable Multi-Factor Authentication (MFA)
Recommendation
Enable Multi-Factor Authentication (MFA) for all user accounts accessing Azure VMs. Enforce strong password policies and implement conditional access policies.
Step-by-Step Implementation
Step 1: Access Microsoft Entra Admin Center
Open the Azure Portal
Search for "Microsoft Entra ID" in the search bar
Click on Microsoft Entra ID from the results
Step 2: Create a Conditional Access Policy
In the Microsoft Entra admin center, navigate to Entra ID > Conditional Access > Overview
Click + Create new policy
Enter a policy name (e.g., "MFA Enforcement Policy")
Step 3: Assign Users or Groups
Under Assignments, select Users or workload identities
Click on What does this policy apply to? and ensure Users and groups is selected
Under Include, choose Select users and groups
Select the users or groups that need MFA (or select All users for organization-wide enforcement)
Click Select
Step 4: Configure Cloud Apps or Actions
Under Cloud apps or actions, select All cloud apps or Select resources
If selecting specific resources, choose Windows Azure Service Management API to apply to Azure portal access
Click Select
Step 5: Set Access Controls
Under Access controls, click on Grant
Select Grant access
Check the box for Require multifactor authentication
Click Select
Step 6: Enable the Policy
Under Enable policy, select On
Click Create to activate the policy
Step 7: Test MFA Implementation
Sign out of the Azure portal
Sign back in with a user account covered by the policy
You should be prompted to complete MFA (phone call, SMS, or authenticator app)
Verification
Users will see an MFA prompt when signing into Azure portal
Check Conditional Access > Policies to confirm the policy is active
Monitor Sign-in logs to verify MFA is being enforced
Impact on Secure Score
✅ Significant improvement - Reduces unauthorized access risks by requiring additional verification
2. AZURE STORAGE: Enable Encryption at Rest and in Transit
Recommendation
Enable Encryption at Rest and in Transit. Use HTTPS/TLS 1.2+, enable Storage Service Encryption (SSE), and enforce Azure AD authentication.
Step-by-Step Implementation
Part A: Verify Storage Service Encryption (SSE) is Enabled
Note: Azure Storage encryption is enabled by default for all storage accounts and cannot be disabled. However, you should verify and configure key management.
Open the Azure Portal
Navigate to your Storage Account
In the left menu, go to Security + networking > Encryption
Verify that encryption is enabled (it should show as enabled by default)
For enhanced security, consider using Customer-managed keys instead of Microsoft-managed keys
Part B: Enable HTTPS-Only Access
In your Storage Account, go to Configuration (under Settings)
Find the Secure transfer required setting
Set it to Enabled (this enforces HTTPS/TLS 1.2+)
Click Save
Part C: Configure Azure AD Authentication
In your Storage Account, go to Access control (IAM)
Click + Add > Add role assignment
Select the appropriate role (e.g., Storage Blob Data Contributor or Storage Blob Data Reader)
Under Assign access to, select User, group, or service principal
Search for and select the users or groups that need access
Click Review + assign
Part D: Disable Shared Key Access (Optional but Recommended)
In your Storage Account, go to Configuration
Find Allow storage account key access
Set it to Disabled (forces use of Azure AD or SAS tokens only)
Click Save
Part E: Enable Infrastructure Encryption (Double Encryption)
For highly sensitive data, enable double encryption:
In your Storage Account, go to Encryption
Check the box for Enable infrastructure encryption
Click Save
Verification
Go to Configuration and confirm Secure transfer required is Enabled
Check Encryption to confirm encryption is active
Attempt to access storage with HTTP (should be blocked)
Verify only HTTPS connections are allowed
Impact on Secure Score
✅ Major improvement - Protects data in transit and at rest, improving data protection posture significantly
3. AZURE SQL DATABASE: Enable Transparent Data Encryption (TDE)
Recommendation
Enable Transparent Data Encryption (TDE). Configure firewall rules, enable Azure AD authentication, and implement vulnerability assessment.
Step-by-Step Implementation
Step 1: Enable TDE on Your SQL Database
Open the Azure Portal
Navigate to your SQL Database
In the left menu, go to Security > Transparent data encryption
You should see that Data encryption is already On by default
If it's not enabled, click the toggle to On
Click Save
Step 2: Configure TDE Key Management
Option A: Use Service-Managed Keys (Default)
TDE is already configured with Microsoft-managed keys
No additional action needed
Option B: Use Customer-Managed Keys (Recommended for Sensitive Data)
In Transparent data encryption, look for TDE protector
Select a key from your Azure Key Vault
Click Save
Step 3: Configure SQL Firewall Rules
Navigate to your SQL Server (not the database)
Go to Security > Firewalls and virtual networks
Under Firewall rules, click + Add a firewall rule
Enter a rule name (e.g., "AllowCorporateNetwork")
Set Start IP and End IP to your organization's IP range
Click OK
Disable "Allow Azure services and resources to access this server" if not needed
Step 4: Enable Azure AD Authentication
In your SQL Server, go to Security > Microsoft Entra ID
Click Set admin
Search for and select a user or group to be the SQL admin
Click Select
Click Save
Step 5: Implement SQL Vulnerability Assessment
In your SQL Database, go to Security > Vulnerability Assessment
Click Enable vulnerability assessment
Select or create a Storage Account for storing assessment reports
Click Save
Click Scan to run an initial vulnerability assessment
Review the results and remediate identified vulnerabilities
Step 6: Enable Advanced Threat Protection
In your SQL Database, go to Security > Microsoft Defender for SQL
Click Enable Microsoft Defender for SQL
Configure alert notifications:
Go to Alert notifications
Add email addresses for security alerts
Click Save
Verification
Go to Transparent data encryption and confirm Data encryption is On
Check Firewalls and virtual networks to confirm rules are in place
Verify Microsoft Entra ID admin is configured
Run a Vulnerability Assessment scan to confirm it's working
Check Microsoft Defender for SQL is enabled
Impact on Secure Score
✅ Significant improvement - Encrypts database at rest, restricts access, and enables threat detection
Summary: Expected Improvements to Secure Score
| Recommendation | Before | After | Impact |
| MFA for VMs | Weak authentication | Strong 2FA/MFA | +15-20 points |
| Storage Encryption | Unencrypted data | Encrypted at rest & transit | +20-25 points |
| SQL TDE + Security | Unencrypted database | Encrypted + firewall + threat detection | +25-30 points |
| Total Expected Improvement | ~45% | ~75-80% | +60-75 points |
Next Steps
Prioritize Implementation: Start with MFA (easiest), then Storage, then SQL
Test Each Change: Verify functionality after each implementation
Monitor Secure Score: Check your score weekly to track improvements
Document Changes: Keep records of all security changes for compliance
Plan Ongoing Maintenance: Schedule regular reviews of security settings
Enable Monitoring: Use Azure Monitor and Log Analytics to track access and changes
Automate these steps with the AzureCLI or Powershell