Learn Azure RBAC: A Cat-Inspired Guide

Azure Role-Based Access Control (RBAC) is a foundational security pillar for managing access to resources in Azure. But let's be honest, diving into IAM concepts can sometimes (most of the times) feel a bit dry(er). So, to make things more engaging, we're going to explore Azure RBAC with the help of my cloud-savvy cats and our trusty Cloud Admin.
This guide will walk you through everything from the basics to advanced security practices, all illustrated with custom infographics to make these concepts easier to digest.
1. What is Azure RBAC & What's It For?
At its core, Azure Role-Based Access Control (RBAC) is a security mechanism for granting users only the permissions they need to perform their jobs. Instead of giving everyone broad access, RBAC allows you to enforce the principle of least privilege.
As our first infographic shows, the process is straightforward:
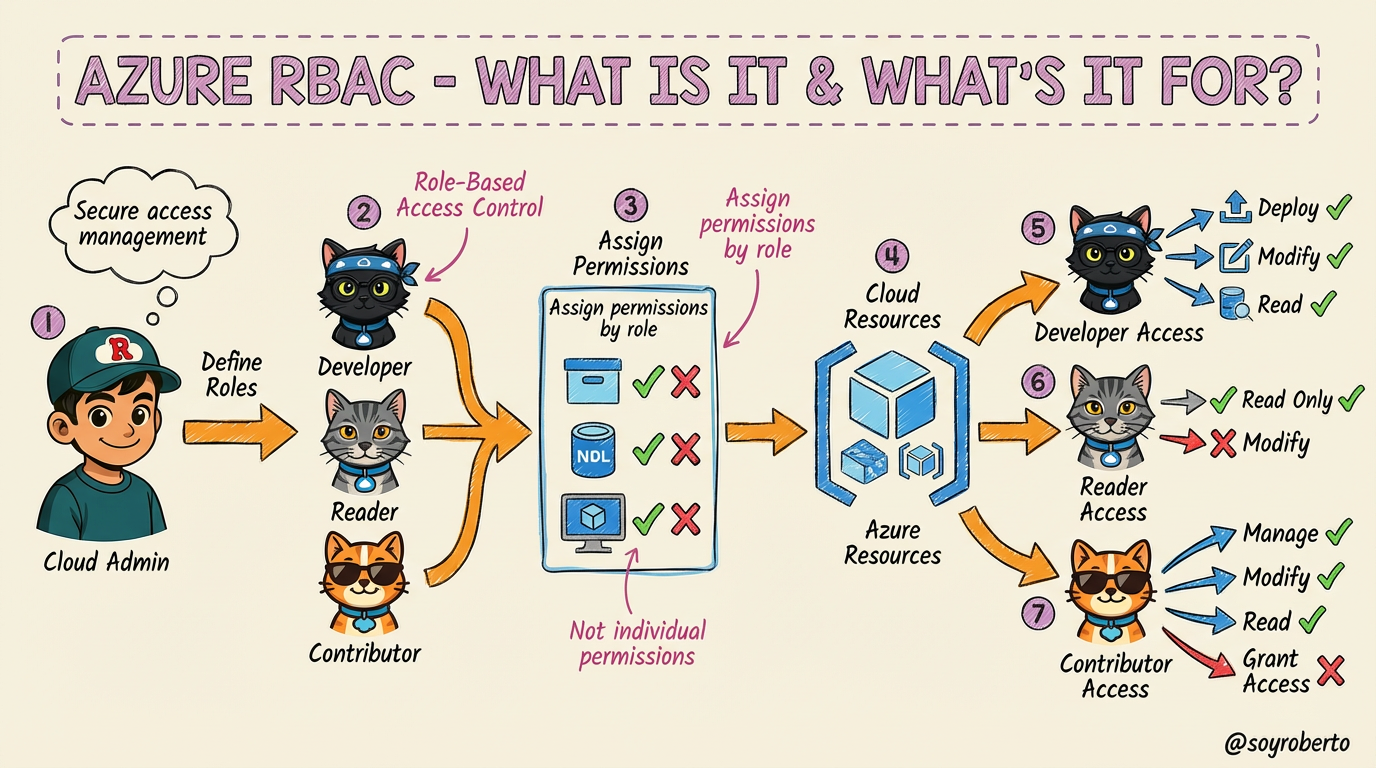
Define Roles: The Cloud Admin (you) defines roles based on job functions. In our example, we have three roles represented by our feline friends:
Developer (Black Ninja Cat/ Truffle ): Needs to deploy and modify resources.
Reader (Gray Cat/ Leonardo): Only needs to view resources.
Contributor (Orange Cat/ Mr. Orange): Can manage resources but not grant access to others.
Assign Permissions by Role: Instead of assigning permissions to individual users, you assign them to roles. This simplifies management significantly.
Secure Access Management: This approach ensures that users can only perform actions within their assigned scope, reducing the risk of accidental changes or malicious activity.
2. Who Benefits & Top Benefits
Azure RBAC isn't just for large enterprises; it benefits organizations of all sizes by providing a structured and secure way to manage access. Let's look at a typical development team workflow to understand the key benefits:
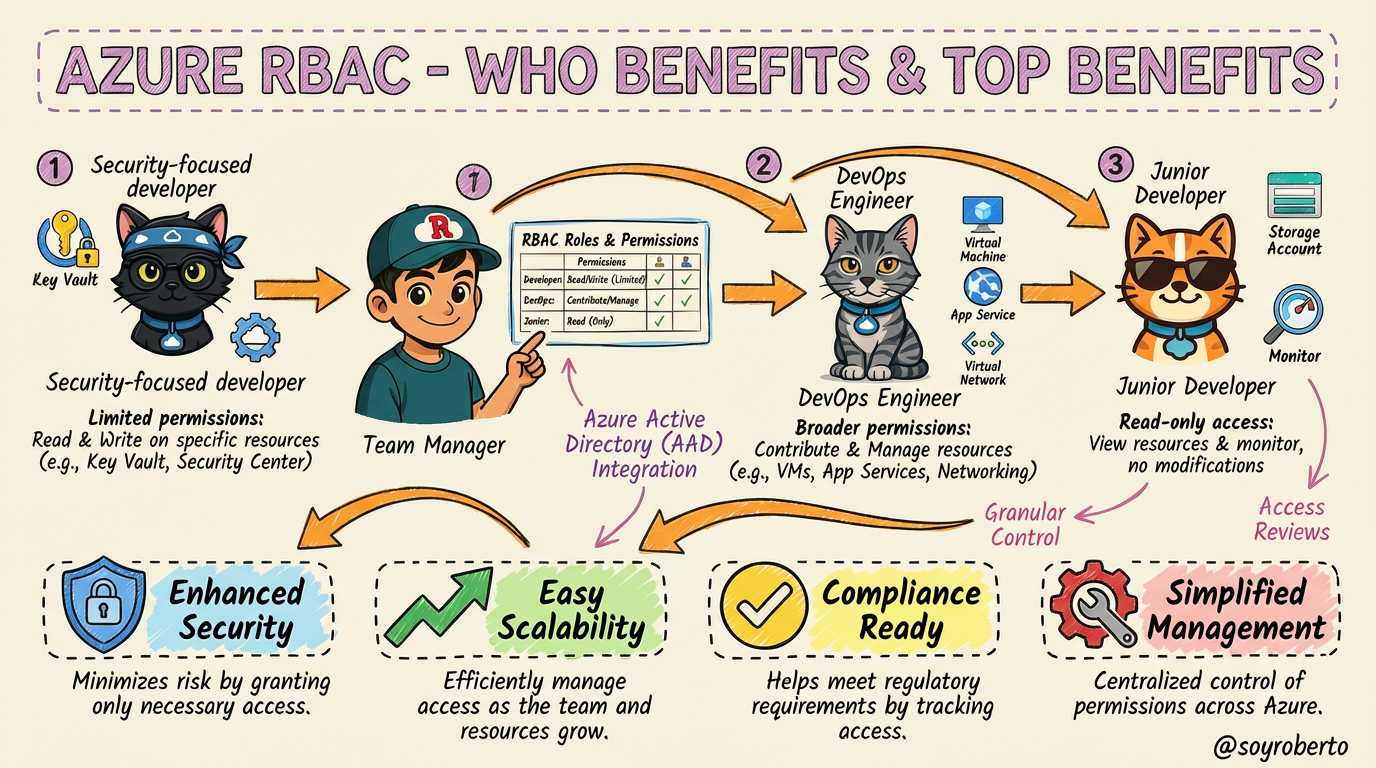
In this scenario, the Team Manager grants specific permissions to each team member:
Security-Focused Developer (Black Ninja Cat / Truffle): Has limited permissions to read and write to specific resources like Azure Key Vault.
DevOps Engineer (Gray Cat /Leonardo ): Has broader permissions to contribute and manage resources like VMs and App Services.
Junior Developer (Orange Cat /Mr. Orange ): Starts with read-only access to view resources and monitor, preventing accidental modifications.
This leads to four major benefits:
Enhanced Security: Minimizes risk by granting only necessary access.
Easy Scalability: Efficiently manage access as the team and resources grow.
Compliance Ready: Helps meet regulatory requirements by tracking and controlling access.
Simplified Management: Centralized control of permissions across Azure.
3. When & Who Should Use It
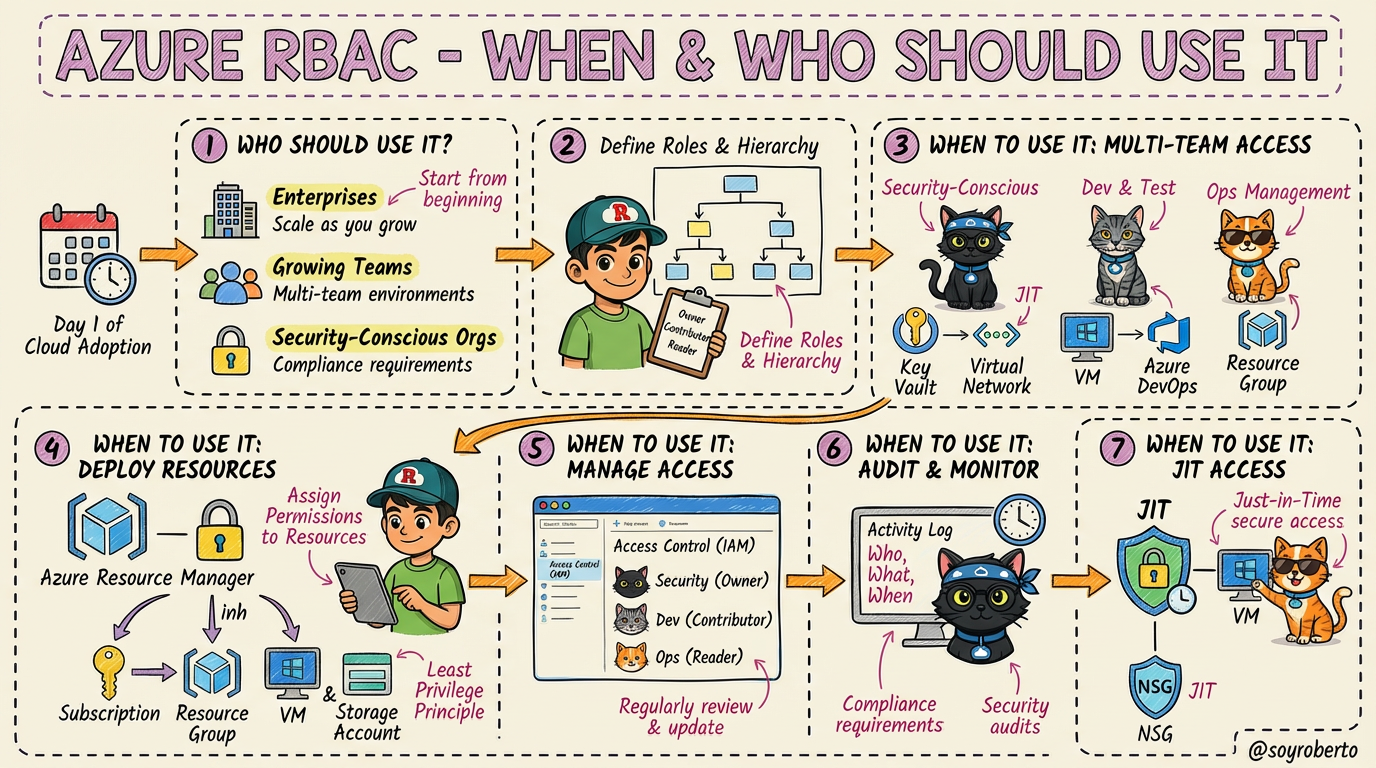
So, when is the right time to implement Azure RBAC, and who should be using it? The short answer is: from day one.
Azure RBAC is essential for:
Enterprises: With complex organizational structures and multi-team environments, RBAC is non-negotiable.
Growing Teams: As your team scales, managing individual permissions becomes chaotic. RBAC provides a scalable framework.
Security-Conscious Orgs: Any organization that prioritizes security and needs to meet compliance requirements will benefit from RBAC.
From deploying resources and managing access to auditing and monitoring, RBAC is integral to every stage of the cloud journey.
4. How to Assign a Custom Azure RBAC Role
While Azure provides many built-in roles, you'll often encounter scenarios where a custom role is needed to enforce the principle of least privilege with precision. Let's say our Black Ninja Cat needs to perform security audits but shouldn't have any modification rights. This is a perfect use case for a custom role.
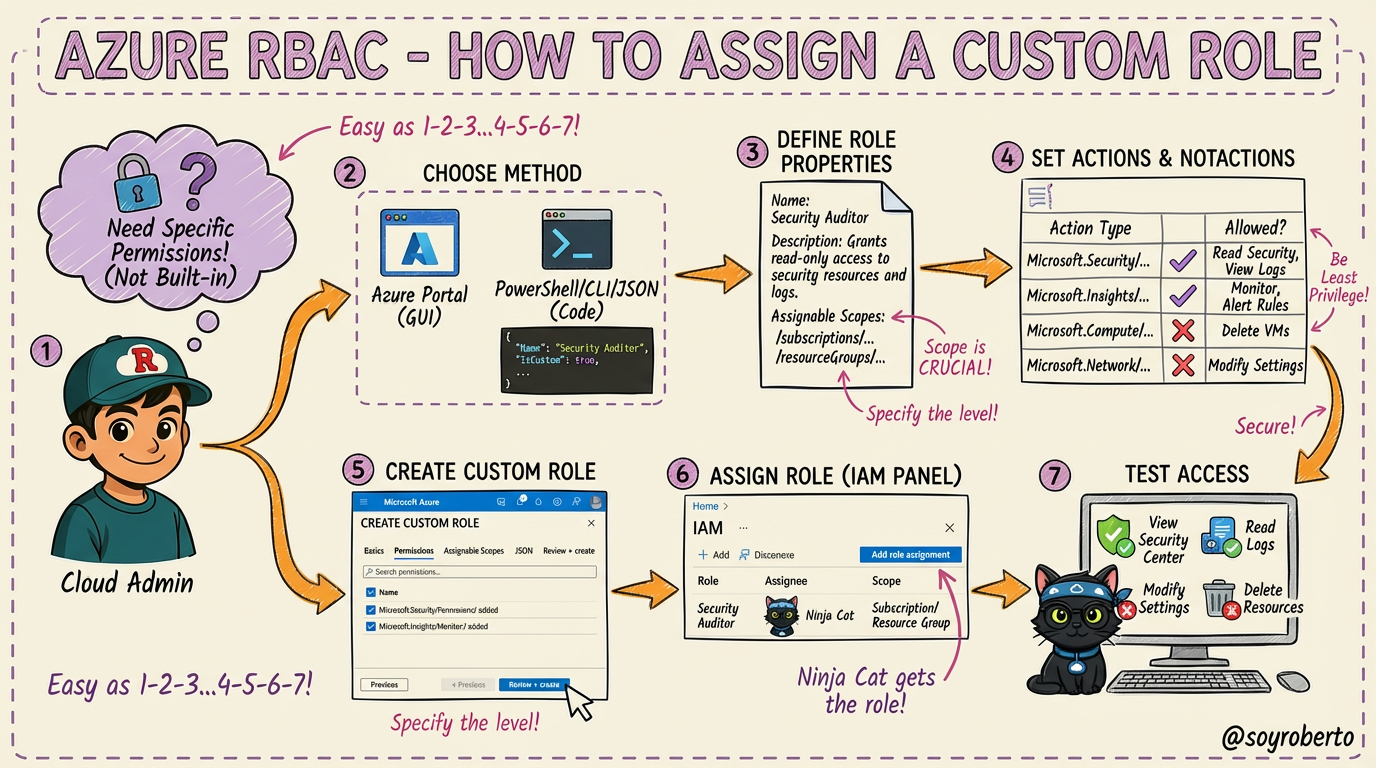
The process involves these steps:
Identify the Need: Recognize that no built-in role matches the specific permissions required.
Choose Your Method: You can create custom roles through the Azure Portal (GUI) or programmatically using PowerShell, Azure CLI, or JSON templates.
Define Role Properties: Give your role a clear name (e.g., "Security Auditor"), a description, and define its assignable scopes (where it can be assigned, like a subscription or resource group).
Specify Permissions: This is the most critical step. You define
Actions(what the role can do) andNotActions(explicitly denied permissions). This ensures the role holder has just enough access to do their job.Create and Assign: Once defined, you create the role and assign it to the user, group, or service principal (in this case, our Ninja Cat).
Verify Access: Always test the custom role to ensure it grants the intended permissions and denies all others.
5. Auditing & Reviewing Role Assignments for Compliance
Granting access is only half the battle. Regularly auditing and reviewing role assignments is crucial for maintaining a strong security posture and ensuring compliance. This is where our audit team comes in.
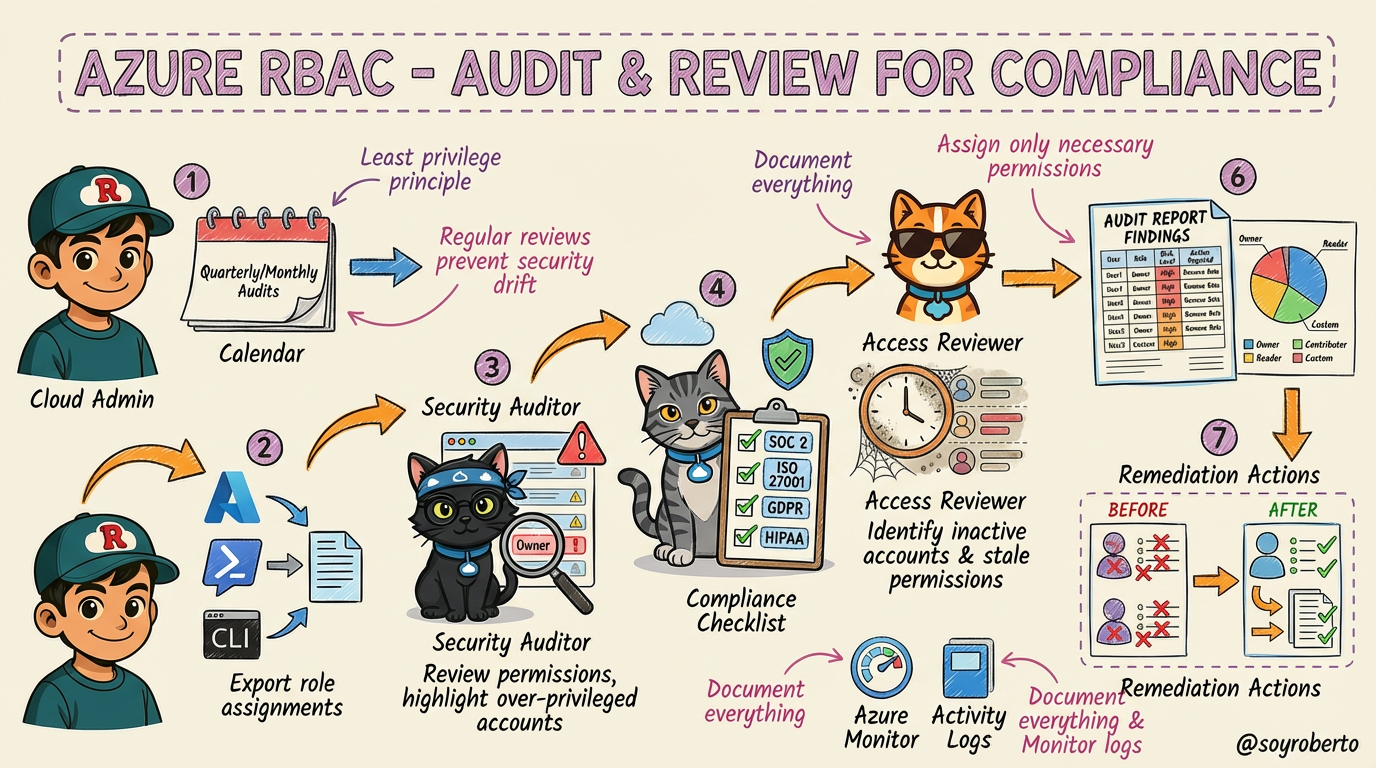
Here’s a structured audit workflow:
Schedule Regular Audits: Establish a cadence (e.g., quarterly or monthly) to review all role assignments. This prevents "security drift," where permissions accumulate over time.
Export Role Assignments: Use Azure Portal, PowerShell, or CLI to get a complete picture of who has access to what.
Identify Over-Privileged Users: Our Security Auditor (Black Ninja Cat) hunts for accounts with excessive permissions, such as unnecessary "Owner" roles.
Check Compliance Requirements: The Compliance Officer (Gray Cotorro Cat) verifies that role assignments align with regulatory standards like SOC 2, ISO 27001, GDPR, or HIPAA.
Review Inactive Assignments: The Access Reviewer (Orange Quesito Cat) identifies and flags stale accounts or unused permissions that should be revoked.
Generate Audit Reports: Document all findings, recommendations, and required actions.
Remediate and Update: Remove unnecessary permissions, update roles, and document all changes to close the loop.
6. Best Practices for Managing Azure RBAC at Scale
As your organization grows, managing RBAC can become complex. Following best practices is essential for maintaining security and efficiency at scale.

Here are seven key practices for enterprise-level RBAC management:
Use Management Groups: Organize your subscriptions into a hierarchical structure. This allows you to apply role assignments at a high level, and permissions will be inherited down the tree.
Standardize Role Definitions: Create a library of reusable custom roles with a consistent naming convention (e.g.,
Corp-DevOps-Contributor).Leverage Azure AD Groups: Always assign roles to groups, not individuals. This simplifies management, as you only need to manage group membership.
Implement Environment Separation: Enforce different permission levels for your Production, Development, and Staging environments.
Use Policy & Blueprints: Implement governance with Azure Policy and ensure repeatable, compliant deployments with Azure Blueprints.
Automate with Infrastructure as Code (IaC): Use ARM templates, Bicep, or Terraform to automate role assignments and ensure consistency.
Monitor & Alert: Set up alerts in Azure Monitor for privileged role assignments and suspicious activities.
7. Securing Privileged Access with Azure PIM
Even with a solid RBAC strategy, privileged accounts remain a top target for attackers. Azure AD Privileged Identity Management (PIM) provides an additional layer of security by enabling Just-in-Time (JIT) access for these sensitive roles.
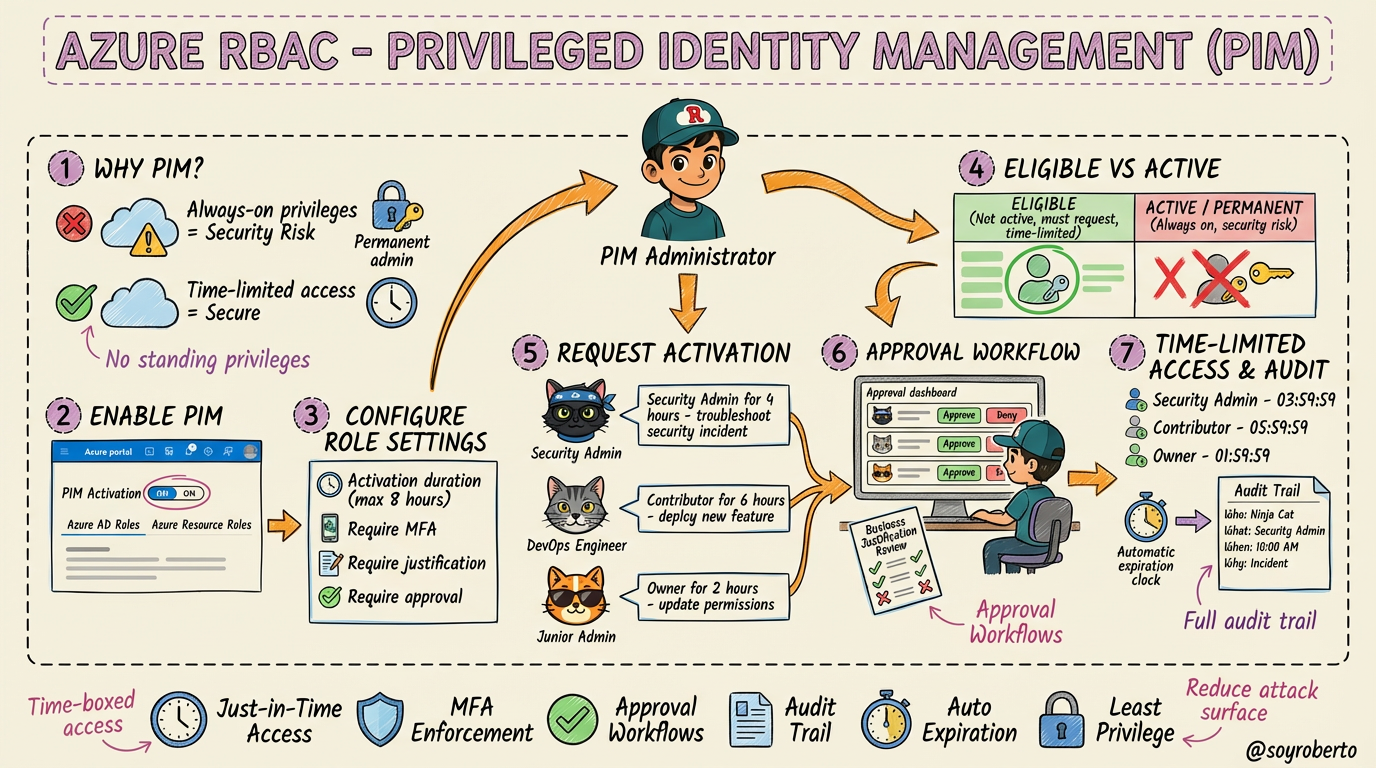
The core idea behind PIM is to eliminate standing/permanent admin access. Instead of being a permanent admin, users are made eligible for a role. When they need to perform privileged tasks, they must go through an activation process.
Key features of PIM include:
Time-Limited Access: Users are granted access only for a limited duration (e.g., 4 hours).
Approval Workflows: Activation can require approval from a designated manager.
MFA Enforcement: Users must perform Multi-Factor Authentication to activate a role.
Justification: Users must provide a reason for activating a role.
Comprehensive Auditing: Every activation is logged, providing a full audit trail of who did what, when, and why.
By using PIM, you significantly reduce the risk of privileged account compromise and ensure that powerful permissions are only used when absolutely necessary.
8. Choosing the Right Approach: A Security Comparison Scorecard
With all these options, how do you choose the right approach for your needs? This final scorecard provides a side-by-side comparison of Standard RBAC, Custom RBAC, and Azure PIM.
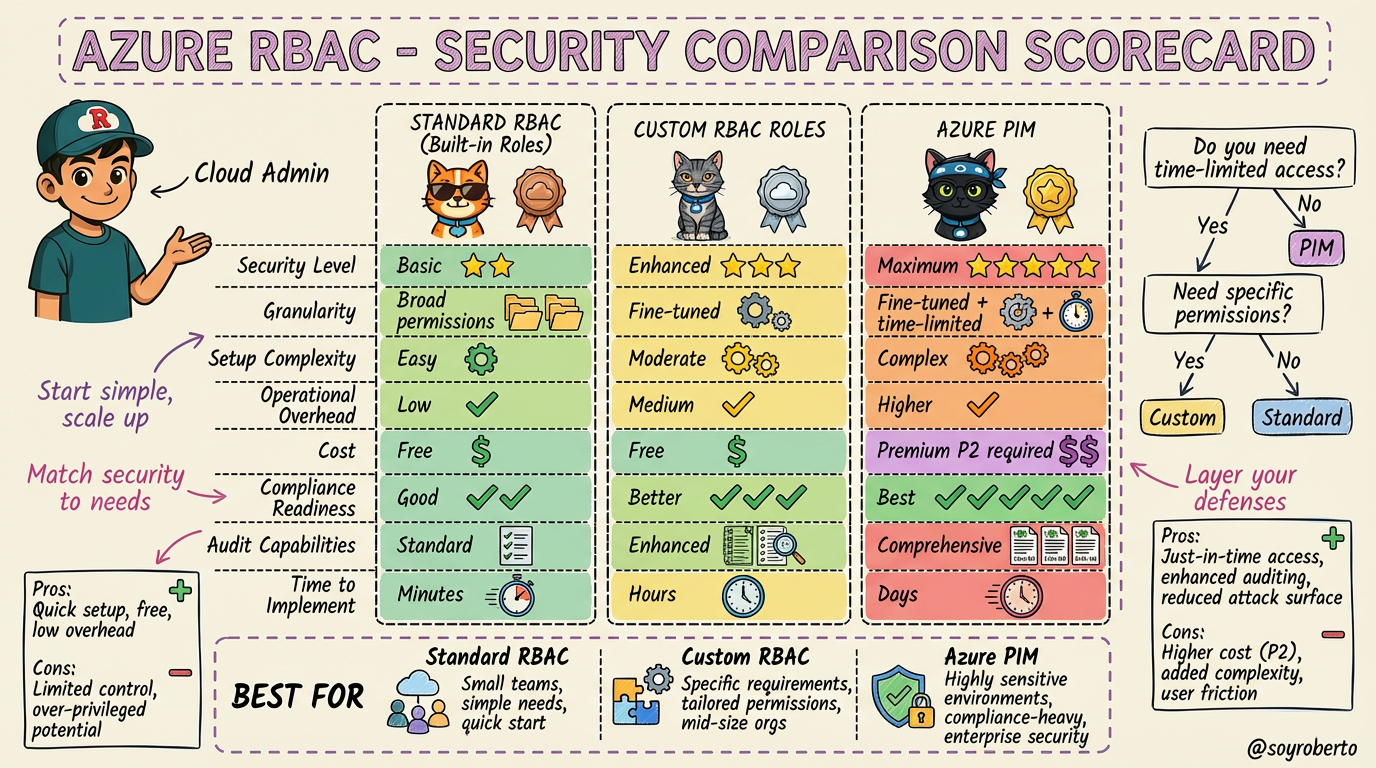
Here’s a quick summary:
Standard RBAC: Best for small teams or simple use cases where built-in roles are sufficient. It’s quick, easy, and free.
Custom RBAC Roles: Ideal when you need to enforce the principle of least privilege with precision. It offers fine-tuned control without additional cost.
Azure PIM: The gold standard for securing privileged access. It’s essential for highly sensitive environments and organizations with strict compliance requirements, though it requires an Azure AD Premium P2 license.
A simple decision tree to guide you:
Do you need time-limited, on-demand privileged access? If yes, use PIM.
If not, do the built-in roles grant too many permissions? If yes, create a Custom Role.
If not, use Standard RBAC.
Conclusion
Mastering Azure RBAC is a journey, not a destination. By starting with the basics, layering in custom roles, and securing privileged access with PIM, you can build a robust and scalable security posture that protects your Azure resources. Remember to start simple, match your security to your needs, and always layer your defenses.
I hope this visual guide with our feline friends has been helpful If you have any questions, feel free to reach out in the comments