Publishing Dynamics CRM via the Azure AD Application Platform
What is it?
AAD-APAAD Connect
Pre requisites
An Azure Active Directory Premium Edition. This is what allows you to Single Sign-on (SSO) to on premise web applications. It’s also available in the Basic Edition; Premium is the one I tested. Source: https://msdn.microsoft.com/en-us/library/azure/dn532272.aspx
Sync enabled and working to your Azure AD Tenant. In many cases users will first enable the synchronization of user for 365 services such as Mail and/or SharePoint, that’s fine, that Directory lives in Azure and can be used for this.
An on premise web application you need to publish to the outside. It is an absolute must that the application you’re going to publish and want to provide SSO has Windows Authentication Enabled in IIS otherwise it will not work.
Enable the Application Proxy in the Azure Premium Subscription
Install the Application Proxy Connector in a domain joined computer. I installed the connector in the same server where the application was running.
Assign users to the Application. The users assigned must be the ones synchronized; user locally created in the Azure AD will not be able to connect.
How does it work?
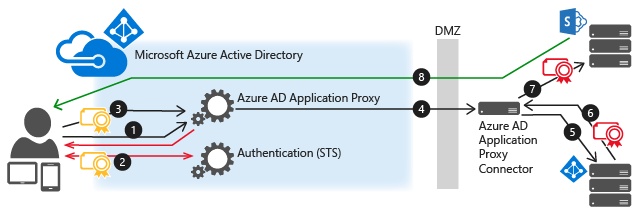
How the Azure App Proxy Works*Source of image: [https://msdn.microsoft.com/en-us/library/azure/dn879065.aspx*](https://msdn.microsoft.com/en-us/library/azure/dn879065.aspx)
The user enters the external URL assigned when the application was published. In my test scenario the published application was the Microsoft Dynamics 2015.
Application Proxy redirects the request to Azure AD authentication services to pre-authenticate. This initial authentication happens with the users that DirSync provisioned from the internal Active Directory.
At this point, Azure AD applies any applicable authentication and authorization policies, such as multifactor authentication. If the user is validated, Azure AD creates a token and sends it to the user. This is the token that will be validated via Kerberos.
The user passes the token to Application Proxy, this happens in the on premise network
Application Proxy validates the token and retrieves the User Principal Name (UPN) from it; and then sends the request, the UPN, and the Service Principal Name (SPN) to the Connector through a dually authenticated secure channel.These two things are fundamental, the UPN must match the user name field in the Azure Active Directory and the SPN must be added to the endpoint host, in this scenario where the Azure Application Proxy is installed. Note: Microsoft has declared that it would also provide support in the future for cases where UPN in the cloud doesn’t match UPN on-prem.It’s very common that the internal AD domain doesn’t match the outside domain. The internal domain in general is not a routable domain in the Internet while the domain in Office 365 must be. For this reason the routable domain has to be added into the internal forest, using the Domains and Trust console.
The Connector performs KCD negotiation with the on premise AD, impersonating the user to get a Kerberos token to the application.
Active Directory sends the Kerberos token for the application to the Connector.
The Connector sends the original request to the application server, using the Kerberos token it received from AD. The application being the Dynamics CRM front end.
Step by Step
- In case you don’t have the directory enabled you can trial it straight from the Azure interface:
The trial lasts 90 days, time enough to give it a go.
- Enable the Azure Application Proxy. Go to your Azure AD -> Configure -> and Scroll down to -> application proxy as shown below
- Publish and configure the application from Azure. Go to your subscription, select the Directory component -> click on applications -> Click on ADD
3.1 Select the option marked below, an application to be published from the outside
3.2 Give the application a meaningful name and click Next
3.3 Add the application properties in the next window
External URL refers to the published address, accessible from the open Internet
The Pre-authentication method will indicate that user has to login with its Azure AD credentials, this to assure the right permissions to access the application. The pass-through method performs no authentication whatsoever on Azure, hence no Single Sign on with this option.
Internal URL is how your users address the on premise application
On the configuration of the application itself, make sure you select the following values:
Again:
Name of the application
The external URL will be automatically generated
Pre-authentication set to Azure Active Directory
When the authentication is set to Azure AD the external URL will always be HTTPS
Internal URL can be HTTP or HTTPS. I only tested with HTTPS. I added a certificate to the IIS where the CRM front end is published
This is the continuation of the previous screenshot.
Select Integrated Windows Authentication
Add the SPN; be aware that the SPN must match the hostname of the external URL, only the hostname not the FQDN (Fully Qualified Domain Name).
Click the Save Button
Configuration on Premise
Install and Register the Azure Proxy component in the CRM Front end
Add the Service Principal Name to the CRM front end
Alternatively add the certificate to the IIS (not included in this document)
- Install the Azure proxy Component
Download the connector and from the CRM front end, run the installation as administrator. When you run the installation you’ll be requested to register it as follow:
The account I used had two characteristics:
It was a synchronized account from the on premise AD; I tested with an Azure AD only account with no success.
The account has to be Global admin on the Azure AD only, it can be a regular account in the local AD
Make sure you do not use the same account to register more than 1 connector, I made this mistake and it cost me hours or debugging. One account registers one application only
Remember SPN syntax is: SERVICE/name, in this case it’d be:
HTTP/msdyncrm-allthingscloud
HTTP/msdyncrm-allthingscloud.msappproxy.net
- Before testing the connection, remember to assign users to the application otherwise, they won’t be able to connect.
- Test
Type the external URL you were assigned when you created the Application Proxy. Type the username you gave permissions to in the previous step, type its password
You should see the application as follows, which is the Dynamics 2015 site:
And that covers the configuration of the Dynamics CRM 2015 using the Azure Web Application Proxy.
Roberto