The Art and Science of AI Image Generation
Welcome to the fascinating world of AI image generation! In this chapter, we will pull back the curtain on how artificial intelligence transforms simple text prompts into vibrant, complex, and often surprising images. Understanding this process is not just for technical experts; it is a crucial skill for anyone looking to master prompt engineering. By learning how the AI "thinks" and "sees," you can craft more effective prompts and unlock the full creative potential of these powerful tools.
We will explore this topic with three different perspectives: Roberto, our curious guide, will introduce the core concepts. Trufa, our technical expert, will dive into the architectural details. And Paula, our eager learner, will help us see the practical and fun side of image generation.
Introduction to AI Image Generation
Roberto: "Hey everyone! Have you ever wondered how you can type a few words and get a stunning picture back? It feels like magic, but it's actually a brilliant blend of art and science. Let's break it down."

The journey of AI image generation has been a rapid and exciting one. It started with blurry, abstract images and has evolved into the photorealistic and artistically diverse creations we see today. This evolution is built on different architectural approaches, with two standing out in particular.
1. Generative Adversarial Networks (GANs):Imagine two AIs in a creative competition. One, the Generator*, creates images. The other, the* Discriminator*, acts as an art critic, trying to tell the difference between the AI-generated images and real ones. The Generator constantly tries to fool the Discriminator, getting better and better with each attempt. This adversarial process, introduced around 2014, was a major breakthrough, but it could be difficult to control and often produced unpredictable results.*
**2. Diffusion Models:**This is the technology that powers most modern, high-quality image generators. The core idea is surprisingly simple: the model learns to remove noise. It starts with a canvas full of random static (like an old TV screen) and, step-by-step, refines it into a coherent image based on the instructions in the prompt. It's like a sculptor starting with a block of marble and slowly chipping away until a masterpiece is revealed. This method offers incredible control and is the focus of our chapter.
The Architecture of Image Generation Models
Trufa: "That's a great overview, Roberto. Now, let's look under the hood. To really master image generation, we need to understand the architecture. I've prepared a diagram that shows two learning paths: the Technical Path for those who love the details, and the Practical Path for a more conceptual understanding."

As Trufa points out, the process is a sophisticated pipeline that transforms language into pixels. Let's follow the flow.
**How Text Prompts Are Processed:**Your prompt isn't just read; it's encoded. A component, often a model like CLIP (Contrastive Language–Image Pre-training), converts your words into a mathematical representation called an embedding. This embedding captures the meaning, context, and relationships between the words, serving as the master blueprint for the image.
**The Step-by-Step Denoising Process:**This is the heart of a diffusion model. The process, often managed by a U-Net architecture, happens in a compressed 'latent space' to save computational power. It iteratively subtracts noise from the initial static image, guided at every step by the text prompt's embedding. Each step brings the image closer to the final vision.
| Path | Description |
| Technical Path | The model predicts the noise (ε) at each timestep (t) conditioned on the text embedding (c). It uses a noise schedule (βt) to control the amount of noise removed in each step, gradually refining the latent representation. |
| Practical Path | Think of it as an artist refining a sketch. The AI starts with a very blurry idea (noise), then progressively adds lines, shapes, colors, and textures, constantly checking back with your request to make sure it's on the right track. |
**Maintaining Coherence:**How does it keep everything looking right? A mechanism called 'cross-attention' allows the model to pay attention to specific words in your prompt while generating different parts of the image. If you say "a red bird on a blue branch," it knows to apply 'red' to the 'bird' and 'blue' to the 'branch', ensuring all the pieces fit together logically.
Exercise: Creating a Manga Version of Trufa
Roberto: "Theory is great, but practice is where the fun begins! Let's walk through a real-world case study: turning our expert, Trufa, into a manga character. This exercise will show you how to apply what we've learned about style and prompting."

This case study is a perfect example of style transfer, where we guide the AI to reinterpret a character in a completely different artistic style.
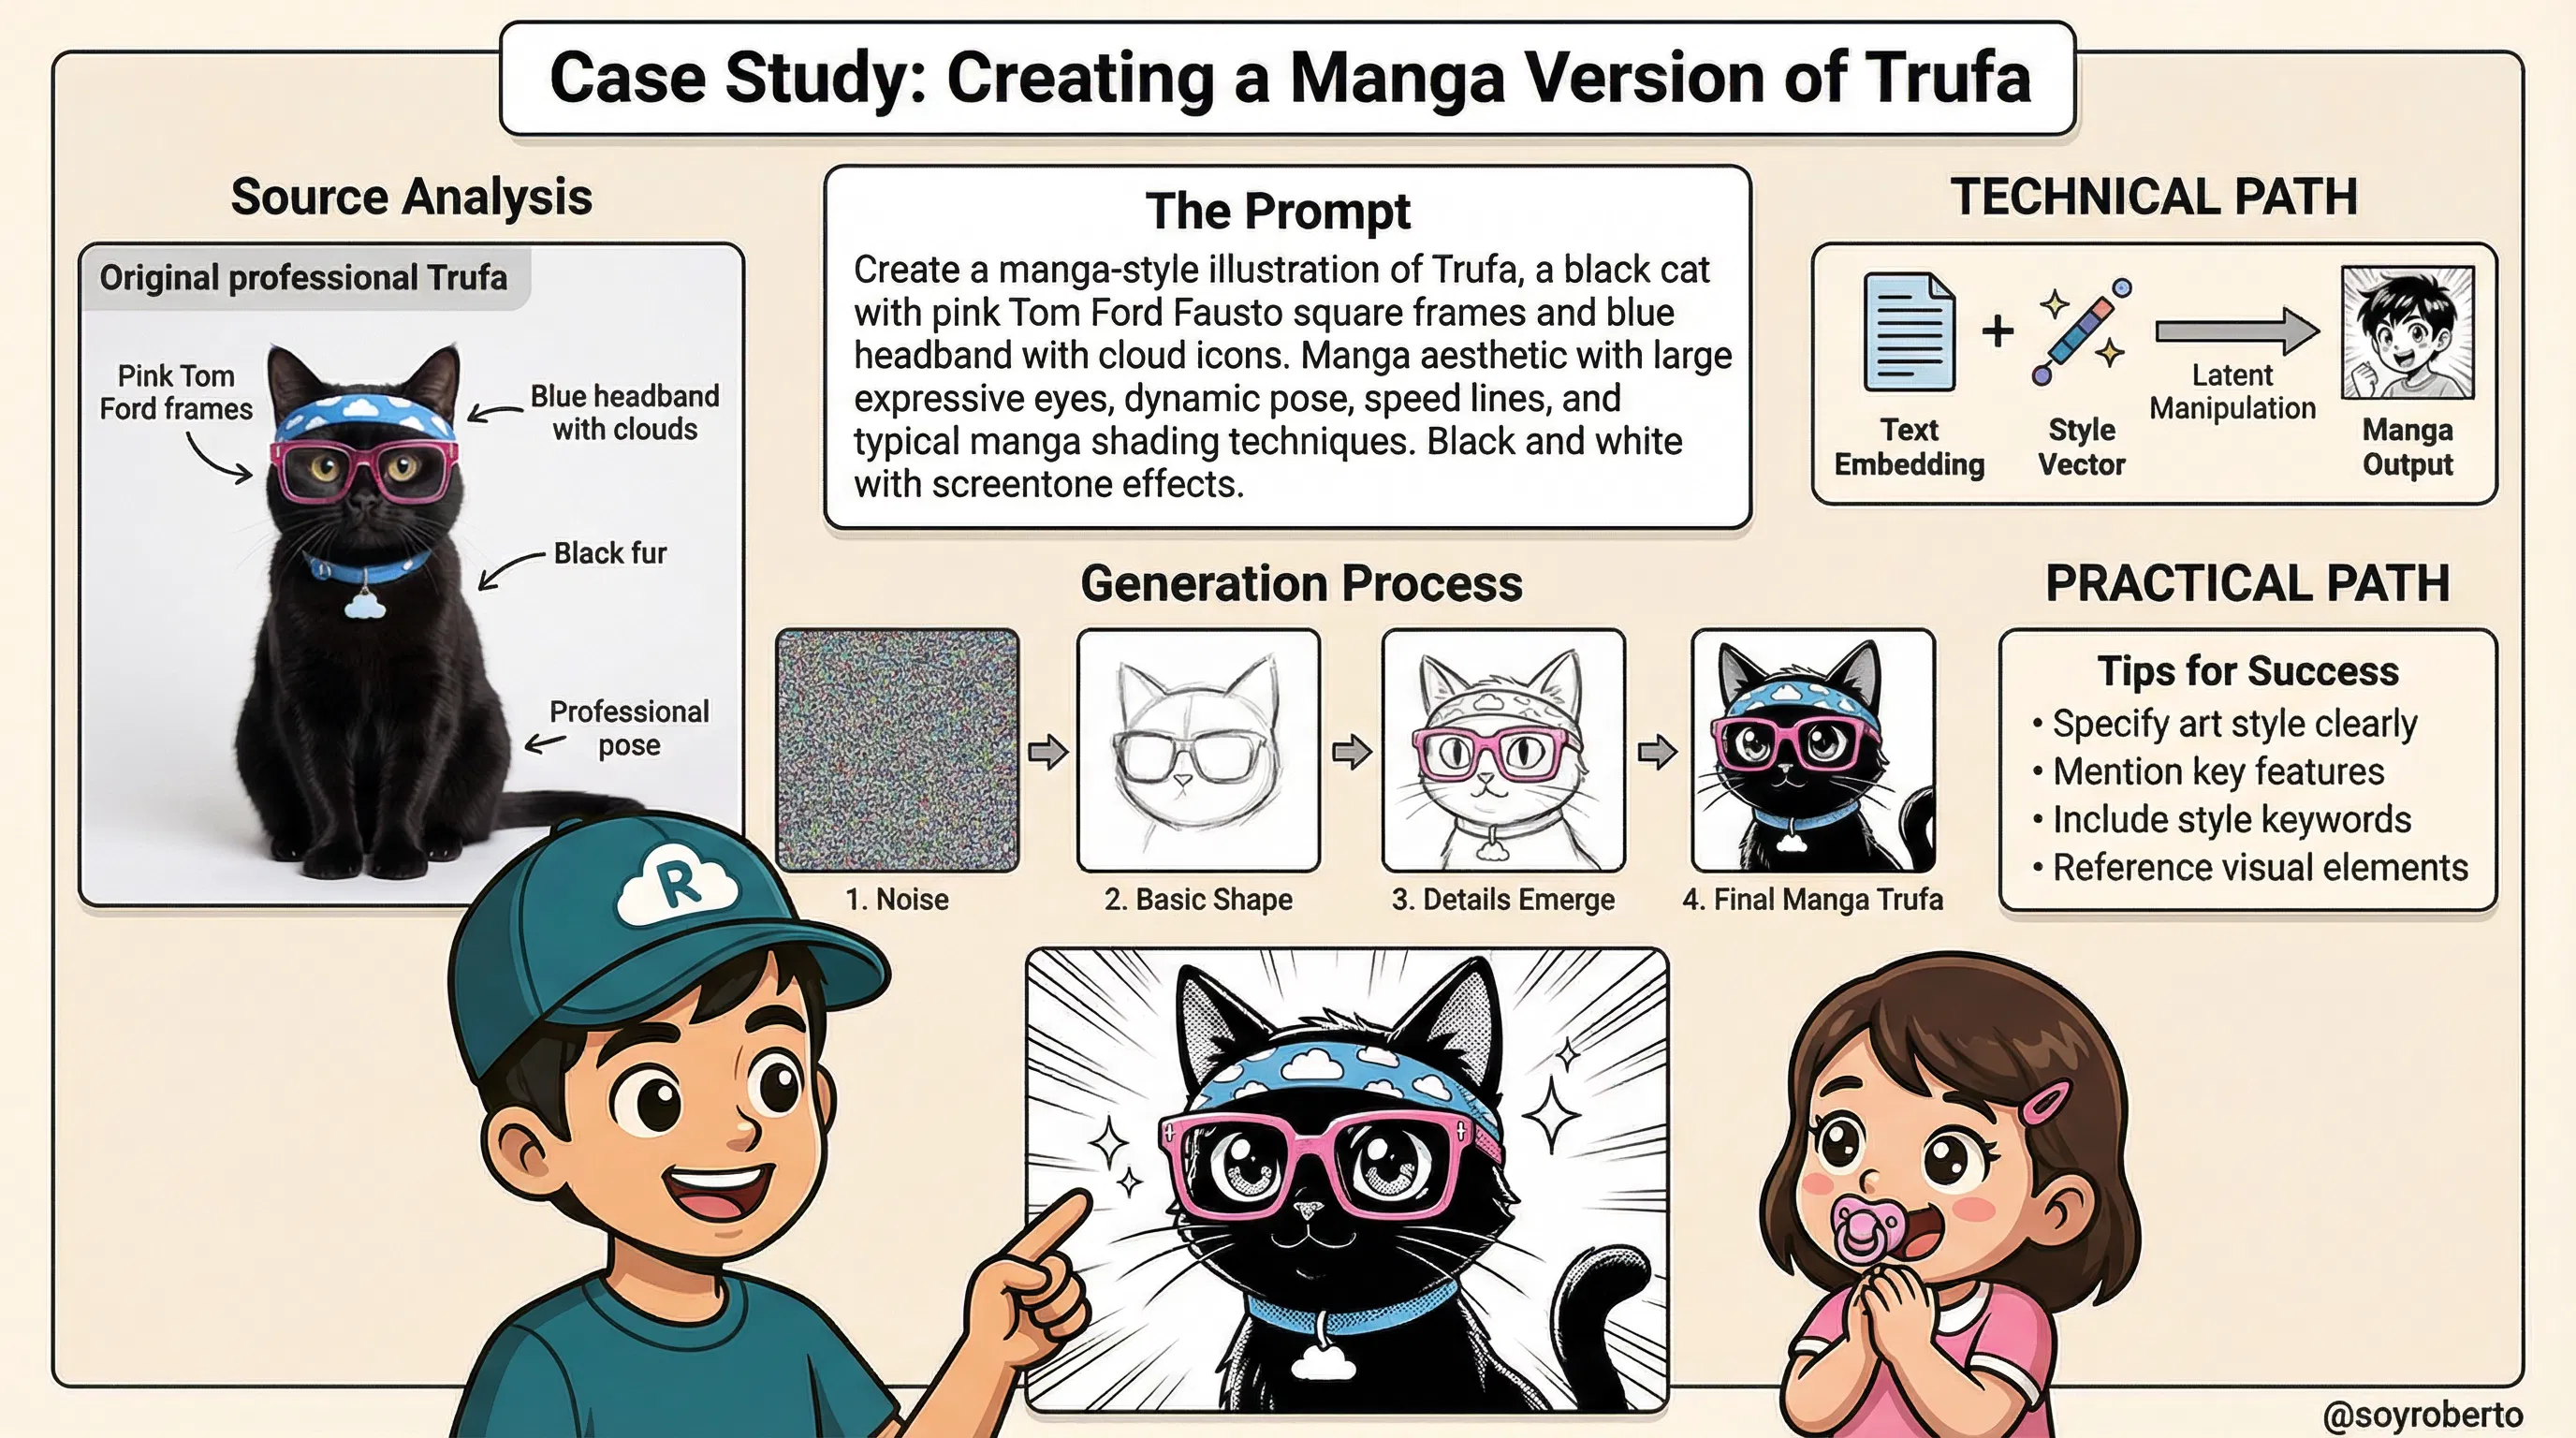
1. Analyzing the Source Image Characteristics: Before writing the prompt, we must identify Trufa's core features: her professional pose, round glasses, black fur, and the signature blue headband with cloud icons. These are the key elements we need to preserve to ensure the manga version is still recognizable as Trufa.
2. Crafting an Effective Prompt for Manga Style: A good prompt is specific. Instead of just saying "in a manga style," we provide more detail. Notice the keywords used in the example prompt: "manga aesthetic," "large expressive eyes," "dynamic pose," "speed lines," and "screentone effects." These are all classic manga tropes that guide the AI toward the desired outcome.
3. The Generation Process Step-by-Step: As the graphic shows, the image begins as pure noise. The model, guided by our detailed prompt, first forms a basic shape, then refines the details (like the glasses and headband), and finally applies the stylistic manga finishes like sharp lines and screentone shading.
| Path | Description |
| Technical Path | This is called style conditioning. The text embedding for "manga style" is combined with the embeddings for Trufa's core features. This creates a combined 'style vector' that biases the denoising process, pushing the latent representation toward the target artistic aesthetic at each step. |
| Practical Path | Think of it as giving an artist a photo of Trufa and saying, "Redraw this, but in the style of your favorite manga." The artist (the AI) keeps the key features but reinterprets them using the new style's rules—exaggerated eyes, dynamic lines, and unique shading. |
Prompt in Action
Quite interesting I modified the 3rd image with the intention to change the frames of Trufa using the following prompt:
“Excellent graphics for Trufa in specific change the glass frames for the tom Ford model called Fausto in pink I'm attaching The frames for reference . Modify the last image of the 3 only

Which created this image as a result (LLM: Manus with Nano Banana as the image creator)
Note the realistic cat in the 1st frame and ALSO
I asked the LLM (manus) to create a video of the image creation process, the prompt:
Create 3-4 separate 8-second clips covering different technical stages
Each clip focuses on one major component with detailed explanation
Check the video and the clear and evident errors in words:
Why Does AI Get Text Wrong in Videos? A Look at the Limitations and Solutions
The Technical Limitations: Why AI Struggles with Text
AI Models Think in Pixels, Not Letters:
- The most important thing to understand is that diffusion models (the technology behind these videos) are trained to generate pixels, not text. They don't have a "font engine" like Microsoft Word or Adobe Photoshop. When you ask for text, the AI isn't typing; it's drawing the shapes of letters it has seen in its vast training data of billions of images.
It's a Game of Statistical Guesswork:
- The AI learns that certain shapes often appear together to form what humans recognize as words. However, it's a statistical approximation. It knows the shape of an "A" is generally two diagonal lines and a crossbar, but it doesn't understand the symbolic concept of the letter "A." This is why it often produces letters that are close but not quite right, or combines them in nonsensical ways.
Lack of Linguistic Rules:
- The model has no underlying knowledge of spelling, grammar, or language structure. It's simply trying to replicate pixel patterns. This is why you'll see correctly formed letters arranged in a completely misspelled or gibberish order. It's recreating the texture of text, not the text itself.
The Video Magnification Problem:
- This issue is even more pronounced in video. The AI has to try and draw these incorrect letter-shapes consistently across dozens or hundreds of frames. Because it's a probabilistic process, each frame is slightly different, causing the text to flicker, morph, and change, which looks highly unprofessional.
The Recommended Approach: The Hybrid Workflow
So, how do you get the best of both worlds—stunning AI visuals and perfect, crisp text? The answer is a hybrid workflow that uses the right tool for the right job.
Step 1: Generate the Visuals Only:
- Use the AI video generator to do what it does best: create the core visual content. Generate your scenes, characters, and animations, but do not include any text in your prompts. Your goal is to get a clean, text-free video file.
Step 2: Import into a Video Editor:
- Take your AI-generated video and import it into a professional or prosumer video editing application. This could be anything from Adobe Premiere Pro, Final Cut Pro, and DaVinci Resolve to more accessible tools like CapCut or Descript.
Step 3: Add Text as a Separate Layer:
- Within the video editor, use the built-in text tools to add all your titles, annotations, and explanations as separate text layers on top of the video. This is the standard method for all professional video production.
Why This is the Best Practice
Guaranteed Accuracy: You have full control over the text, ensuring perfect spelling, grammar, and punctuation.
Total Creative Control: You can choose the exact font, size, color, and animation for your text to match your brand identity. You can make it fade in, slide across the screen, or pulse with light—all with precise control.
A Professional Finish: The final product will have sharp, clean, and stable text, which is essential for viewer trust and a professional appearance.
Efficiency and Specialization: This approach lets the AI specialize in complex visual creation while you use a tool specifically designed for typography and titling. It's the most efficient and effective way to produce high-quality content.
By understanding these limitations and adopting a hybrid workflow, you can leverage the incredible power of AI video generation without being held back by its current weaknesses.
This concludes the first part of our chapter. In the next sections, we will explore more advanced techniques, including commercial design considerations and the ethical responsibilities of every AI artist.
Case Study: Sega-Inspired Paula for T-Shirt Design
This graphic breaks down the process of creating a commercially viable T-shirt design, using a Sega-inspired version of Paula as the case study.

The process is divided into four key areas:
Section 1: Commercial Considerations: This section outlines the fundamental principles of designing for physical merchandise. Unlike digital-only images, T-shirt designs must be visually impactful from a distance, use high-contrast colors that print well on fabric, and feature bold, simple designs that are easily recognizable. The goal is to create a product that is not only aesthetically pleasing but also commercially effective and scalable across different sizes and colors.
Section 2: Adapting the Prompt for Sega Aesthetic: Here, we see the specific prompt crafted to achieve the desired 16-bit retro look. The prompt is highly descriptive, using keywords like "classic Sega Genesis style," "16-bit pixel art aesthetic," "bold outlines," and "limited color palette." This level of detail is crucial for guiding the AI model to generate an image that accurately captures the specific artistic style of that era, moving from the original character design to a stylized, game-ready sprite.
Section 3: Technical Path - How the Model Interprets 'Sega Style': This section provides insight into the model's "thought process." The AI doesn't understand "Sega" in a human sense. Instead, when it processes these keywords, it accesses its vast training data to find patterns associated with them. It retrieves stylistic features from images of classic Sega games (like Sonic the Hedgehog), extracting core elements such as pixel grid patterns, color quantization (reducing the number of colors), and the characteristic bold outlines. It then applies these extracted style features to the core features of the subject, Paula.
Section 4: Practical Path - Design Principles: This summarizes the key takeaways for creating effective merchandise designs. It emphasizes the importance of a strong silhouette for immediate recognition, a limited color palette for printability and visual cohesion, bold outlines to define the character, and maintaining brand consistency—in this case, the retro gaming charm of the Sega brand.
Image 2: The Complete Computational Pipeline - A Deep Dive
This infographic provides a detailed, step-by-step visualization of the complete computational pipeline for generating an image from both a text prompt and a reference image. Each step represents a critical transformation in the journey from abstract ideas to a final pixel-based image.

Text Prompt Tokenization: The process begins by breaking the natural language prompt ("Create Sega-style Paula") into smaller, manageable units called tokens. This allows the model to process the request computationally.
Reference Image Preprocessing: The source image of Paula is standardized. It's resized to a uniform dimension (e.g., 512x512 pixels) and its pixel values are normalized (scaled to a range of 0 to 1). This ensures consistency for the model's encoder.
Parameter Configuration: Key parameters are set to control the generation process. Steps determine the number of denoising iterations (more steps can mean more detail), while CFG Scale (Classifier-Free Guidance) controls how closely the model adheres to the prompt.
Text Encoding (CLIP): The text tokens are fed into an encoder like CLIP (Contrastive Language-Image Pre-training), which converts them into numerical representations called embeddings. These embeddings capture the semantic meaning of the text in a high-dimensional vector space.
Image Encoding (VAE Encoder): The preprocessed reference image is passed through a Variational Autoencoder (VAE). The encoder part of the VAE compresses the image from its high-resolution pixel space into a much smaller, lower-dimensional latent space. This makes the subsequent computational steps far more efficient.
Cross-Attention Mechanism: This is a critical step where the model aligns the semantic meaning from the text embeddings with the visual features from the image's latent representation. It allows the model to understand which parts of the text (e.g., "Sega style") correspond to which parts of the image.
Latent Space Fusion: The guidance from both the text embeddings and the image latent are combined into a single, unified latent representation. This fused latent serves as the starting point and guide for the denoising process.
U-Net Denoising Process: This is the core of the diffusion model. Starting with a field of random noise, the U-Net architecture iteratively removes the noise over a set number of steps (e.g., 50). In each step, it predicts the noise based on the guidance from the fused latent and subtracts it, gradually revealing the final image.
Style Vector Injection: Throughout the denoising process, the specific "Sega aesthetic" (represented as a style vector) is injected at multiple layers of the U-Net. This ensures the stylistic elements are deeply integrated into the image as it forms, rather than being applied superficially at the end.
VAE Decoding: Once the denoising process is complete, the final, clean latent representation is passed to the VAE's decoder. The decoder upscales and converts the latent data back into a full-resolution pixel image.
Post-Processing: The final image undergoes touch-ups to make it production-ready. This can include color correction to enhance vibrancy, sharpening to improve detail, and contrast adjustments to make the design pop, ensuring it's optimized for its intended use, such as T-shirt printing.
Conclusion: Your Journey as a Digital Creator
This chapter has peeled back the curtain on the art and science of AI image generation, transforming what might have seemed like digital magic into a tangible, understandable process. Let's recap what we've learned and look ahead to what's next on your creative journey.

What We Learned
We embarked on a comprehensive exploration, starting with the foundational concepts of AI image generation and its evolution from GANs to the powerful Diffusion Models that dominate the landscape today. We dissected the complete computational pipeline, demystifying each of the 11 critical steps—from tokenizing a simple text prompt to the final post-processing of a generated image. Through our case studies, we saw how to apply these concepts practically, whether adapting a character to a new artistic style like the Sega-inspired Paula or understanding the commercial considerations for merchandise design.
The Importance of These Topics
Understanding this technical pipeline is no longer just for AI researchers; it is a fundamental literacy for the modern creator, designer, and even business leader. By grasping how a model interprets prompts, fuses concepts, and refines an image from noise, you gain unprecedented control over your creative output. This knowledge empowers you to move beyond simple prompting into the realm of true digital artistry, enabling you to debug unexpected results, craft more effective prompts, and intentionally guide the AI to produce the precise vision in your mind. For businesses, it unlocks new efficiencies in marketing, product design, and content creation.
Current Challenges in the Space
Despite its rapid advancements, the field of AI image generation is not without its challenges. As we've seen, achieving perfect, legible text within images remains a significant hurdle. Models can struggle with complex compositions, anatomical accuracy (especially hands), and maintaining perfect character consistency across multiple generations. Furthermore, the ethical considerations surrounding bias in training data, the potential for misuse, and questions of copyright and artistic ownership are ongoing, critical conversations that the entire community must engage with responsibly.
Next Steps: What to Learn Next
Your journey is just beginning. The skills you've developed in this chapter are the building blocks for even more advanced applications. As you move forward, consider exploring these exciting frontiers:
Advanced Prompting Techniques: Dive deeper into concepts like prompt weighting, negative prompts, and token-level editing to gain even finer control.
AI Video Generation: Apply your understanding of diffusion models to the temporal domain, learning how to create dynamic video sequences from text or image prompts.
3D Model Generation: Explore how these same principles are being extended to create three-dimensional assets for gaming, virtual reality, and product prototyping.
Ethical AI and Responsible Creation: Continue to educate yourself on the ethical implications of this technology and learn best practices for creating fair, unbiased, and responsible AI-generated content.
This is a field that evolves daily, but with the solid foundation you've built here, you are well-equipped to grow with it. Keep experimenting, stay curious, and continue to push the boundaries of what's possible.